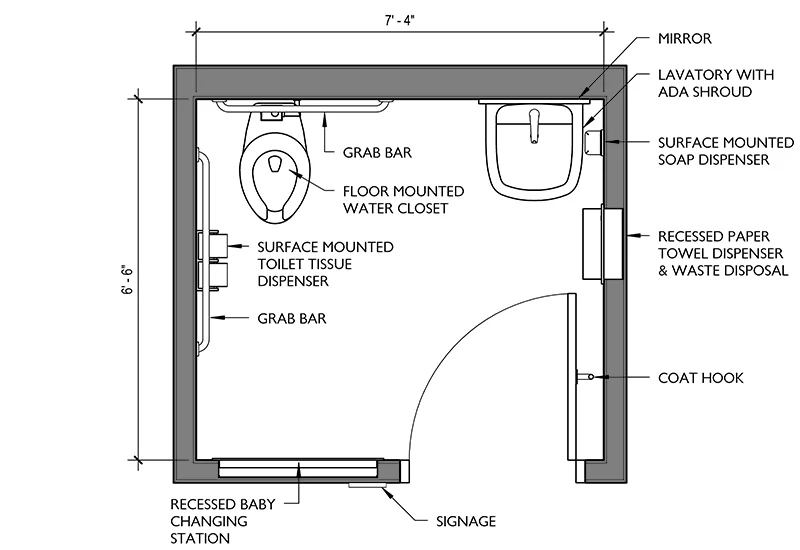
ADA Bathroom Layout: A Complete Guide to Accessible Restroom Design

Designing an ADA-compliant bathroom layout is more than just ticking off a checklist; it’s about creating an inclusive space that allows individuals with disabilities to navigate comfortably. The Americans with Disabilities Act (ADA) sets specific guidelines to ensure accessibility for everyone, including wheelchair users and individuals with mobility impairments.
An ADA-compliant bathroom layout includes appropriate door widths, maneuvering space, grab bar placements, sink heights, and more. These elements not only improve accessibility but also enhance the usability of restrooms for all individuals. Whether you’re designing a public restroom, commercial space, or even a private home, understanding these guidelines is crucial.

Key Dimensions for an ADA Bathroom Layout
When designing an ADA-compliant restroom, precise measurements play a vital role. The dimensions ensure that wheelchair users have enough room to enter, turn, and use the facilities without obstacles. The most important aspects of an ADA bathroom layout include clear floor space, turning radius, and fixture positioning.
- The minimum clear floor space required for a wheelchair to turn is typically 60 inches in diameter.
- Doorways must be at least 32 inches wide to accommodate wheelchairs comfortably.
- Toilets must be positioned with a centerline 16 to 18 inches from the adjacent wall, with enough space for side transfers.
- Sinks must have at least 27 inches of knee clearance below and be mounted no higher than 34 inches from the floor.
Accessible Doorways and Entry Points
Entryways are the first point of accessibility in any bathroom. A proper ADA bathroom layout ensures that doors are easy to navigate, whether a person is using a wheelchair, walker, or crutches.
- The door must provide at least 32 inches of clear width when fully opened.
- It should have a minimal threshold height (preferably ½ inch or less) to avoid tripping hazards.
- Door handles should be operable with a closed fist, ensuring ease of use without requiring tight grasping or twisting.
- The bathroom should allow for maneuvering clearance outside and inside to prevent obstruction.
Toilet Stall Requirements in an ADA Bathroom Layout
The toilet area is a crucial part of an ADA-compliant bathroom. Proper stall dimensions, grab bars, and seat height ensure that individuals with disabilities can use the facilities safely and comfortably.
- The stall must be at least 60 inches wide and a minimum of 56 inches deep for wall-mounted toilets (59 inches deep for floor-mounted toilets).
- Grab bars must be installed on the side and rear walls, positioned between 33 and 36 inches above the floor.
- The toilet seat must be between 17 and 19 inches high from the ground.
- Adequate space must be provided to allow for a side or front transfer from a wheelchair to the toilet.
Proper Sink and Mirror Placement for Accessibility
Sinks and mirrors play a vital role in ensuring a fully functional ADA bathroom layout. They should be positioned to accommodate all users, including those seated in wheelchairs.
- The sink’s height should be no more than 34 inches from the floor.
- There must be at least 27 inches of knee clearance below the sink to allow wheelchair users to roll under comfortably.
- Faucets should be easily operable without requiring pinching or tight grasping.
- Mirrors should be mounted with the bottom edge no higher than 40 inches above the floor.
Grab Bar Placement for Safety
Grab bars are essential for ensuring stability and preventing falls. ADA regulations specify where these bars should be placed to maximize safety and usability.
- Side grab bars must be at least 42 inches long and positioned between 33 and 36 inches above the floor.
- Rear grab bars must be at least 36 inches long and placed behind the toilet.
- These bars should be easy to grip, with a diameter between 1.25 to 1.5 inches.
- They must be securely mounted to support at least 250 pounds of force.
Shower and Bathtub Accessibility Considerations
ADA-compliant showers and bathtubs should accommodate users with various mobility challenges. These fixtures should include roll-in access, seating, and properly positioned controls.
- Roll-in showers must be at least 30 inches wide and 60 inches deep, allowing wheelchair access.
- Grab bars should be installed on all sides to provide support.
- A built-in or fold-down seat must be included for users who need seating while showering.
- Shower controls should be within reach, ideally between 38 to 48 inches from the floor.
- Bathtubs must have a transfer seat, grab bars, and accessible faucet controls.
Flooring and Slip Resistance in an ADA Bathroom Layout
Flooring is an often overlooked but essential aspect of ADA-compliant bathrooms. The right material can reduce slip hazards and make the space safer for all users.
- Choose non-slip surfaces to prevent falls, especially in wet areas.
- Avoid rugs or mats that can create tripping hazards.
- Ensure flooring transitions are smooth and don’t create height differences that could impede wheelchair movement.
Signage and Visibility for ADA Compliance
Clear and visible signage is necessary for guiding users to accessible restrooms. ADA-compliant signage includes:
- High-contrast lettering for readability.
- Raised characters and Braille for visually impaired individuals.
- Signs placed at the correct height (typically 48 to 60 inches from the floor).
Common Mistakes in ADA Bathroom Layouts
Many designers overlook critical ADA guidelines, resulting in non-compliant bathrooms that fail to provide true accessibility. Some common mistakes include:
- Insufficient maneuvering space for wheelchairs.
- Improper grab bar placement that makes them ineffective.
- Sinks installed too high, preventing access for wheelchair users.
- Doors that are too narrow or difficult to open.
- Lack of clear signage or improperly positioned mirrors.
The Importance of ADA Compliance in Public and Private Spaces
ADA compliance isn’t just about following regulations—it’s about creating inclusive environments. An accessible restroom allows people of all abilities to maintain independence and dignity. In public spaces, ADA compliance is legally required, but even in private homes, making a bathroom accessible can greatly enhance functionality for elderly or disabled family members.
Final Thoughts on ADA Bathroom Layout
Creating an ADA-compliant bathroom layout requires careful planning, attention to detail, and adherence to guidelines that promote accessibility. From proper doorway dimensions to strategically placed grab bars, every element contributes to making a space that accommodates everyone. Whether you’re designing for a business, public facility, or home renovation, ensuring accessibility in your restroom design is a step toward a more inclusive world.
By implementing ADA guidelines correctly, you’re not just meeting legal requirements—you’re making a meaningful difference in the lives of individuals who rely on these essential features. Take the time to design with accessibility in mind, and you’ll create a bathroom that serves all users with comfort and ease.


