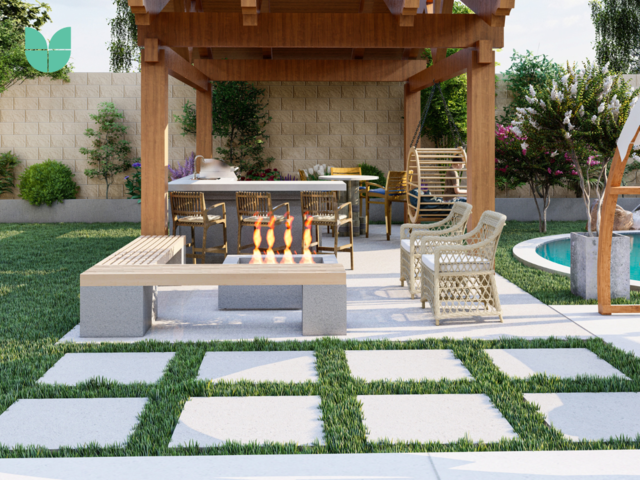
Cinder Block Bench: A DIY Guide to Creating a Stylish and Functional Outdoor Seating

A cinder block bench is a budget-friendly, durable, and easy-to-build outdoor seating option that adds both functionality and style to your space. Whether you have a backyard, patio, or garden, a DIY cinder block bench can transform the look of your outdoor area. With minimal materials and tools required, this simple project is ideal for DIY enthusiasts and homeowners looking for an affordable seating solution.
In this article, we will guide you through the process of building a cinder block bench, its benefits, and creative design ideas to suit your aesthetic preferences.

Why Choose a Cinder Block Bench?
1. Affordability
One of the biggest advantages of a cinder block bench is its cost-effectiveness. Cinder blocks are inexpensive and readily available at hardware stores. Compared to traditional outdoor furniture, this DIY project can save you a significant amount of money.
2. Durability and Strength
Cinder blocks are known for their sturdiness and long-lasting nature. When properly assembled, a cinder block bench can withstand various weather conditions, making it an excellent choice for outdoor seating.
3. Easy Assembly
Building a cinder block bench requires no advanced carpentry skills or special tools. With basic materials like cinder blocks, wooden planks, and adhesive, you can construct a stylish bench in just a few hours.
4. Customization Options
A cinder block bench allows you to get creative with different designs, colors, and cushion choices. You can paint the cinder blocks to match your outdoor decor or add decorative elements for a personalized touch.
Materials Needed for a Cinder Block Bench
Before you begin constructing your cinder block bench, gather the necessary materials:
- 8 to 12 cinder blocks (depending on the length of the bench)
- 3 to 4 wooden planks (for seating)
- Outdoor paint or spray paint (optional)
- Heavy-duty construction adhesive (if securing the blocks permanently)
- Sandpaper (to smooth wood edges)
- Cushions or pillows for added comfort
Step-by-Step Guide to Building a Cinder Block Bench
Step 1: Choose a Location
Select a flat, stable surface for your cinder block bench. Ensure there is enough space to accommodate the bench and allow comfortable seating.
Step 2: Arrange the Cinder Blocks
Decide on the bench’s height and width. A common approach is stacking two or three cinder blocks on each side to form the base. Position them in a U-shape or an L-shape, depending on the desired layout.
Step 3: Secure the Blocks
If you want a more permanent cinder block bench, use heavy-duty construction adhesive to glue the blocks together. This will provide extra stability and ensure the bench stays in place over time.
Step 4: Prepare the Wooden Planks
Sand the wooden planks to remove rough edges and splinters. You can stain or paint them to match your outdoor decor.
Step 5: Insert the Wooden Planks
Slide the wooden planks through the holes in the cinder blocks to create the seating surface. Ensure they are evenly spaced and secure.
Step 6: Add Cushions and Finishing Touches
For added comfort, place cushions or pillows on top of the bench. You can also decorate the bench with potted plants or string lights for a cozy ambiance.
Creative Design Ideas for Your Cinder Block Bench
1. Painted Cinder Blocks
Add a pop of color by painting the cinder blocks in bright hues. This simple touch can elevate the look of your outdoor seating.
2. Built-In Planter Bench
Create a multifunctional cinder block bench by using some of the block openings as planters. Fill them with flowers, succulents, or herbs for a natural aesthetic.
3. Cushioned Lounge Bench
Enhance comfort by adding thick cushions or an upholstered seat. This makes the bench more inviting for relaxation and social gatherings.
4. L-Shaped Corner Bench
If you have a spacious outdoor area, consider arranging the cinder blocks in an L-shape to create a wraparound seating area for entertaining guests.
5. Rustic Wooden Finish
For a rustic look, use reclaimed wood for the seating planks and leave the cinder blocks in their natural gray color.
Maintenance and Care Tips
- Weather Protection: If you live in an area with extreme weather conditions, consider applying a sealant to protect the cinder blocks from moisture damage.
- Regular Cleaning: Wipe down the bench periodically to remove dust and dirt. If necessary, use a mild soap solution for a deeper clean.
- Cushion Storage: Store cushions indoors during rainy or winter months to prevent damage and prolong their lifespan.
- Reinforcement: Check the stability of the bench occasionally and reapply adhesive if necessary.
Conclusion
A cinder block bench is a stylish, functional, and cost-effective addition to any outdoor space. With minimal effort and materials, you can create a durable seating area tailored to your style. Whether you prefer a modern, rustic, or colorful design, a DIY cinder block bench offers endless customization possibilities. By following the simple steps outlined in this guide, you can build a bench that not only enhances your outdoor area but also provides a comfortable place for relaxation and social gatherings.


